What you will need:
Docker - https://www.docker.com/
Copacetic - https://project-copacetic.github.io/copacetic/website/
Trivy - https://trivy.dev/latest/ (Optional, but highly recommended)
Dive - https://github.com/wagoodman/dive (Optional)
From its own definition, ‘Copa is a CLI tool written in Go and based on BuildKit that can be used to directly patch container images without full rebuilds.’ When I first read that, I definitely had a raised eyebrow, as had most of the team members I demoed this product to, not because we did not believe the claim, but because we had created some pretty ‘complex’ containers, and I had no doubt that Copacetic would surely hit some walls during its process. Well, there was only one way to find out.
To do that, I took my own application container I had created for testing purposes. I ran a pretty basic security scan, which found around 200 issues, which was expected. I ran the copacetic commands, and ran the scan against the newly generated container. 0 issues found.
Well, that was pretty nice to see, but what about the functionality of the container? Had anything broken? I ran the rest of the pipeline against the newly created container and deployed it, with no issues. Well, this definitely warranted further investigation, but after getting the same results with all of the smaller scale containers I threw at it, I needed something more tangible. Thankfully, after some digging I found a team that was in the process of redesigning and migrating their application, for a big 2.0 release, and they graciously let me add my copacetic stage to their test pipelines. And lo and behold, we had the same results. Working container images with 0 vulnerabilities scanned, almost like magic. Container images, some with upwards of 5000 security vulnerabilities, suddenly becoming significantly more secure. It was almost too good to be true. It did take a while, but I later did discover some outliers, where instead of removing 100% of security issues, over 95% of them were generally removed. Still though, a 95% reduction in vulnerabilities could be the difference between a stable product and a production security threat.
So, how does this all work? Firstly, it's again important to note, Copa is capable of patching "OS level" vulnerabilities. This includes packages (such as openssl) in the image that are managed by a package manager such as apt-get or yum. It is not currently capable of patching vulnerabilities at the "application level" such as Python packages or Go modules. That being said, OS level packages will most likely be a big culprit in your vulnerability count.
So, what ‘magic’ is Copacetic doing under the hood that allows for such drastic improvements in security? Ultimately, what it comes down to, is that the tool adds a tiny “patch” layer to your container, like sticking a patch on torn jeans, so you get security fixes without a full rebuild. If you are unfamiliar with layers, the gist of it is that docker containers are built using them. To better understand what Copacetic is doing, let's take a look at a basic image, in this case, the official Playwright image provided by Microsoft, that allows users to easily run their tests in a pipeline with minimal setup.
```
docker pull mcr.microsoft.com/playwright:v1.50.0-noble
```
Going forward from here, to view the contents of the image itself to get a better understanding, I recommend using the dive tool for this, as it shows us a lot of detail about the different layers in our images. It can also be used to help reduce the size of your containers, but we won't be focusing on that today
```
dive mcr.microsoft.com/playwright:v1.50.0-noble
```

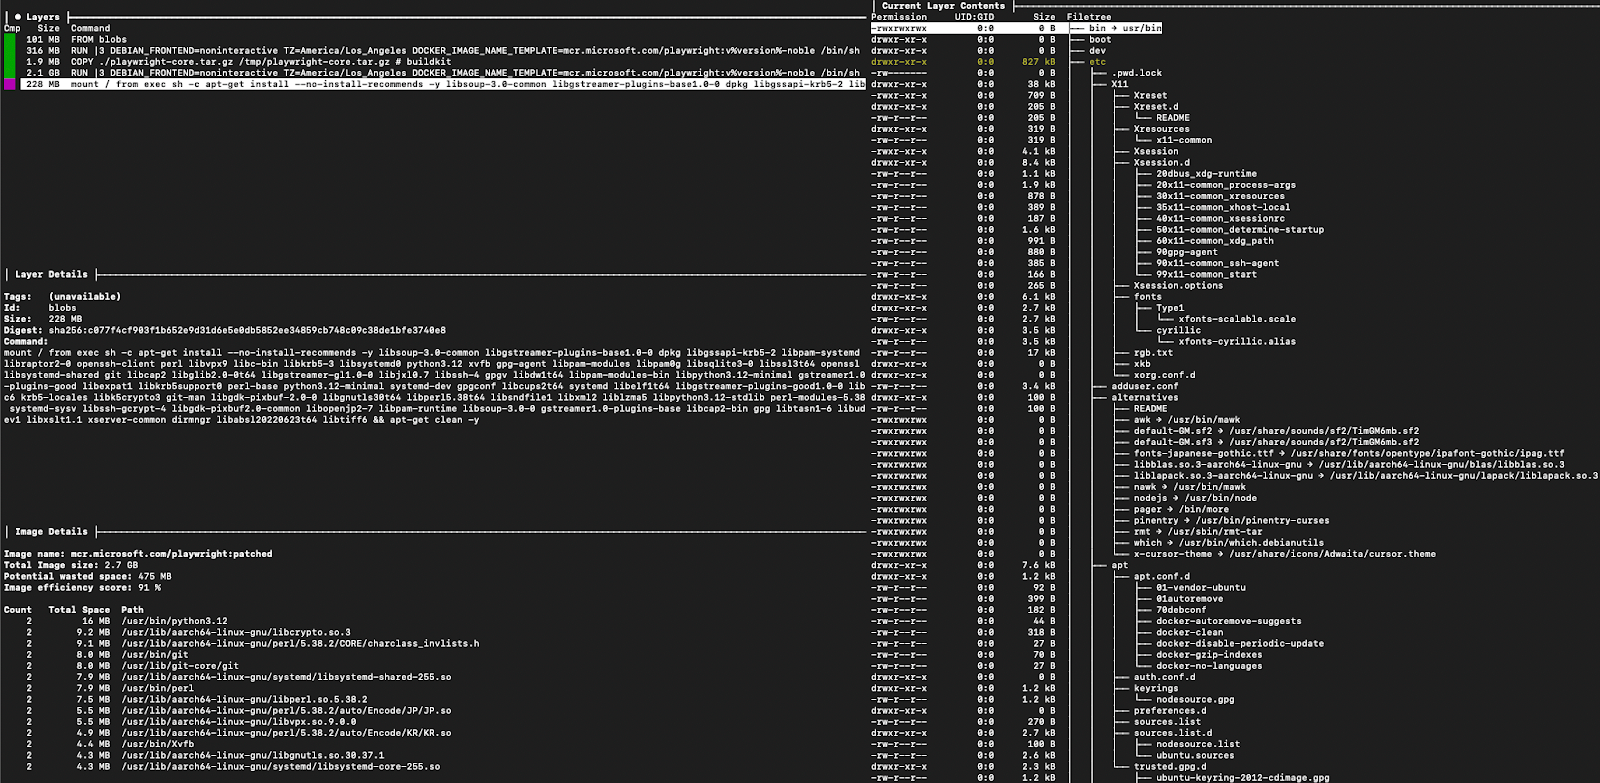
From the above, we can see that the image has 4 layers. It’s important to note, If you are seeing 15 in Docker Desktop, this is because Docker will show history entries, including empty metadata-only steps like ENV and ARG, while dive shows only filesystem-diff layers, which is what we are focusing on in this example.
So using this example, and looking at each layer:
1. It usually starts with a base layer, usually another container image that contains the operating system we need
2. Various commands are then run sequentially to install whatever packages may be needed to get the application run, in this scenario, the tools and packages required to run Playwright
3. Then some files are copied from a local location, to the image, in this case, the Playwright core code.
4. Additional commands are then run to install the Playwright framework, so the image is ready to be used out of the box.
These layers are essentially then built up to be the final container image that we can then use to run the application. So, using the same Microsoft Playwright image as an example, let’s run a security scan to view the results!
It's important to note that while Trivy is not essential for patching your images, it will definitely yield improved results.
```
trivy image --pkg-types os mcr.microsoft.com/playwright:v1.50.0-noble || true
```
After the scan runs, we see the below:
```
Report Summary
Target │ Type │ Vulnerabilities │ Secrets │
mcr.microsoft.com/playwright:v1.50.0-noble (ubuntu 24.04) │ ubuntu │ 268 │ - │
Total: 268 (UNKNOWN: 0, LOW: 23, MEDIUM: 243, HIGH: 2, CRITICAL: 0)
```
Definitely not the worst, but it gives us a solid comparison to use for later, additionally, we can use the report from Trivy to actually parse the results through to Copacetic, so Copacetic will have better information on what vulnerabilities to patch
```
trivy image --pkg-types os -f json -o results.json mcr.microsoft.com/playwright:v1.50.0-noble
```
Now we have a container image with some vulnerabilities, and a report containing those vulnerabilities. Lets run Copacetic against this image with the report and see what happens. Before this though, it is important to have buildkit running since that is what Copectic uses to patch the image. This can be done locally with
```
docker run -d --rm --privileged --name buildkitd --entrypoint buildkitd moby/buildkit:latest
```
With buildkit running, lets patch our image!
```
copa patch -i mcr.microsoft.com/playwright:v1.50.0-noble -r results.json --debug --addr docker-container://buildkitd --timeout=5m -t patched
```
You will see a list of CVE’s detected by the Trivy scan that Copa intends to patch. Leave it to run for a few minutes. Once it is complete, you should not be able to access the patched image using Dive.
Using Dive again, we can now see an additional 5th layer has been added. But what exactly does that layer contain? Lets use Dive again to find out. Note: we are now using the patched tag.
```
dive mcr.microsoft.com/playwright:patched
```
From the above command, going to the patched layer, we can see Copacetic patched the image by adding the below layer, making it now 5 layers

Those are all the packages that Trivy detected had vulnerabilities, and Copacetic was able to patch. With that being done, let's perform one final step, rerunning Trivy to check if all the vulnerabilities have been removed.
```
trivy image --pkg-types os mcr.microsoft.com/playwright:patched || true
```
```
Report Summary
Target │ Type │ Vulnerabilities │ Secrets │
mcr.microsoft.com/playwright:v1.50.0-noble (ubuntu 24.04) │ ubuntu │ 0 │ - │
Total: 0 (UNKNOWN: 0, LOW: 0, MEDIUM: 0, HIGH: 0, CRITICAL: 0)
```
And just like that, a significantly more secure container! I highly recommend you test this on your own containers to help find the limits and how Copacetic can best help you. Your next step would need to be to get all of this running in your pipeline. I have the below Gitlab jobs and scripts that may assist with this. Please note for the below we need docker in docker (DinD) to be enabled for this to work
.gitlab-ci.yml
```
stages: [patch]
variables:
DOCKER_HOST: tcp://docker:2375
DOCKER_TLS_CERTDIR: ""
BUILDKIT_VERSION: v0.18.0
TRIVY_VERSION: "0.67.0"
COPA_VERSION: "0.11.1"
SOURCE_IMAGE: "mcr.microsoft.com/playwright:v1.50.0-noble"
# TARGET_IMAGE: "$CI_REGISTRY_IMAGE/nginx:1.21.6-patched" # Use this to name your patched image
# PUSH_REMOTE: "true" # Use this when you want to push your patched image
Patch:
stage: patch
image: docker:27
services:
- name: docker:27-dind
alias: docker
retry: 2
before_script:
- apk add --no-cache bash coreutils curl tar zstd
# Install Trivy
- curl -fsSL -o /tmp/trivy.tgz "https://github.com/aquasecurity/trivy/releases/download/v${TRIVY_VERSION}/trivy_${TRIVY_VERSION}_Linux-64bit.tar.gz"
- tar -C /usr/local/bin -xzf /tmp/trivy.tgz trivy
# Install Copa
- curl -fsSL -o /tmp/copa.tgz "https://github.com/project-copacetic/copacetic/releases/download/v${COPA_VERSION}/copa_${COPA_VERSION}_linux_amd64.tar.gz"
- tar -C /usr/local/bin -xzf /tmp/copa.tgz copa
script:
- mkdir -p ci-outputs
- OUTPUT_DIR=ci-outputs bash ./patch_image.sh "$SOURCE_IMAGE" ${TARGET_IMAGE:+$TARGET_IMAGE}
- zstd -19 -T0 ci-outputs/patched-image.tar && rm ci-outputs/patched-image.tar
artifacts:
paths:
- ci-outputs/patched-image.tar.zst
- ci-outputs/patched-image.tag
- ci-outputs/results.json
- ci-outputs/results_patched.json
expire_in: 1 week
```
Patch_image.sh
```
#!/bin/bash
set -Eeuo pipefail
IMAGE="${1:?Usage: patch_image.sh <source-image> [<remote-target-ref>]}"
PATCHED_IMAGE="${2:-}"
BUILDKIT_VERSION="${BUILDKIT_VERSION:-v0.18.0}"
OUTPUT_DIR="${OUTPUT_DIR:-/outputs}"
RESULTS_JSON="$OUTPUT_DIR/results.json"
RESULTS_PATCHED_JSON="$OUTPUT_DIR/results_patched.json"
OUTPUT_TAR="${OUTPUT_TAR:-$OUTPUT_DIR/patched-image.tar}"
OUTPUT_TAG_FILE="${OUTPUT_TAG_FILE:-$OUTPUT_DIR/patched-image.tag}"
PUSH_REMOTE="${PUSH_REMOTE:-false}" # "true" to push if creds provided
mkdir -p "$OUTPUT_DIR"
# start buildkit inside the job's Docker daemon (dind)
docker rm -f buildkitd >/dev/null 2>&1 || true
docker run -d --rm --privileged --name buildkitd moby/buildkit:${BUILDKIT_VERSION}
# derive local repo:tag for the patched image
tag="${IMAGE##*:}"; [[ "$tag" == "$IMAGE" ]] && tag="latest"
repo="${IMAGE%:*}"; [[ "$repo" == "$IMAGE" ]] && repo="$IMAGE"
local_tag="${repo}:${tag}-patched"
echo "Running initial scan on $IMAGE..."
trivy image --pkg-types os --ignore-unfixed -f json -o "$RESULTS_JSON" "$IMAGE"
echo "Patching $IMAGE..."
copa patch -i "$IMAGE" -r "$RESULTS_JSON" --debug --addr docker-container://buildkitd --timeout=5m -t "${tag}-patched"
echo "Saving patched image to $OUTPUT_TAR ..."
docker save -o "$OUTPUT_TAR" "$local_tag"
echo "$local_tag" > "$OUTPUT_TAG_FILE"
# optional push when registry creds + target ref present
if [[ "$PUSH_REMOTE" == "true" && -n "${PATCHED_IMAGE}" ]]; then
echo "Attempting registry login/push to $PATCHED_IMAGE ..."
mkdir -p /root/.docker
if [[ -n "${DOCKER_AUTH_CONFIG:-}" ]]; then
echo "$DOCKER_AUTH_CONFIG" > /root/.docker/config.json
elif [[ -n "${CI_REGISTRY:-}" && -n "${CI_REGISTRY_USER:-}" && -n "${CI_REGISTRY_PASSWORD:-}" ]]; then
echo "$CI_REGISTRY_PASSWORD" | docker login "$CI_REGISTRY" -u "$CI_REGISTRY_USER" --password-stdin
elif [[ -n "${DOCKER_USERNAME:-}" && -n "${DOCKER_PASSWORD:-}" ]]; then
docker login "${DOCKER_REGISTRY:-https://index.docker.io/v1/}" -u "$DOCKER_USERNAME" -p "$DOCKER_PASSWORD"
else
echo "No registry credentials provided; skipping push."
PUSH_REMOTE=false
fi
if [[ "$PUSH_REMOTE" == "true" ]]; then
docker tag "$local_tag" "$PATCHED_IMAGE"
docker push "$PATCHED_IMAGE"
fi
fi
echo "Final scan on patched image (local)..."
trivy image --pkg-types os --ignore-unfixed -f json -o "$RESULTS_PATCHED_JSON" "$local_tag"
echo "Done. Artifacts at $OUTPUT_DIR"
```
The above will run and output your patched image, along with the results pre-and-post patch.
If you would rather build this into a docker image that you can simply call in your job, I have made the below dockerfile for you to use:
```
# Use Docker-in-Docker base image
FROM docker:latest
# Set environment variables
ENV COPA_VERSION=0.11.1 \
BUILDKIT_VERSION=v0.18.0 \
BUILDKIT_PORT=8888 \
DOCKER_HOST=tcp://docker:2375 \
DOCKER_TLS_CERTDIR="" \
TRIVY_VERSION=0.67.0
# Install necessary tools
RUN apk add --no-cache wget tar coreutils bash && \
wget "https://github.com/aquasecurity/trivy/releases/download/v${TRIVY_VERSION}/trivy_${TRIVY_VERSION}_Linux-64bit.tar.gz" && \
tar -C /usr/local/bin -zxvf trivy_${TRIVY_VERSION}_Linux-64bit.tar.gz trivy && \
chmod +x /usr/local/bin/trivy && \
wget "https://github.com/project-copacetic/copacetic/releases/download/v${COPA_VERSION}/copa_${COPA_VERSION}_linux_amd64.tar.gz" && \
tar -C /usr/local/bin -zxvf copa_${COPA_VERSION}_linux_amd64.tar.gz copa && \
chmod +x /usr/local/bin/copa && \
rm -f trivy_${TRIVY_VERSION}_Linux-64bit.tar.gz copa_${COPA_VERSION}_linux_amd64.tar.gz
# Copy the patch script into the image
COPY patch_image.sh /usr/local/bin/patch_image.sh
RUN chmod +x /usr/local/bin/patch_image.sh
# Make sure the container waits for commands
CMD ["tail", "-f", "/dev/null"]
```
Simply call it in your job, pass through the required variables and run the patch_image.sh script provided above.
```
Patch:
image: <your-built-copacetic-image>
script:
- patch_image.sh
```
And there you have it! A more secure way of patching images with Copacetic. I hope it brings you a better security posture and if not, spriteCloud can help!
Contact us at projects@spritecloud.com to discuss your projects and see how we can help bolster your security posture.